Saturday, January 30, 2010

Nancy's Fancy Dinner: Grilled Pork Chops

Wednesday night I ate at a fine restaurant. The food was delicious, and the service top notch. I'm always amused, though, at the wait staff's description of menu items at such dining establishments. For instance, Wednesday I had a pan broiled filet of Scottish salmon served on a bed of lightly creamed spinach in a lemon curd sauce (There was some risotto involved too. I can't remember how it was described). Anyway, the wait staff always promote the dishes to make them sound as delectable as possible, as if they have to convince me to order dinner. I always want to respond, "I'm already seated, and I've got wine in front of me. It's pretty much a sure thing I'm going to order an entree."

But I don't because the servers are always so nice, and they work so hard. I know they're just doing their jobs.

Fine restaurant descriptions usually follow a pattern. There's always an adjective preceding the entree. Two adjectives make the meal sound even better. The meal is usually served with some kind of unique salsa or chutney as well as some kind of reduction. Example: "Tonight's special is a pan-seared Georgia pork tenderloin served with a cherry-mango salsa in an orange juice reduction."

Such enticing descriptions are a far cry from the answers I got growing up when I asked, "What's for dinner." If my siblings and I caught parents on a good day with that question, the conversation would go like this:

Kids: "What's for dinner?"

Parents: "Pork chops."

That's it. No salsa. No reduction. We knew there would be a side dish or two, but that was irrelevant. There was no attempt to entice. Just an answer to the question so we would get out of the kitchen. Now, if we ever caught parents on a testy day, the information was even more sparse:

Kids: "What's for dinner?"

Parents: "You'll find out when I put it in front of you."

But I guess that attitude doesn't sell many pan-broiled filets of Scottish salmon at twenty-five bucks a plate. Still, last night, my kids came in the kitchen and asked, "What's for dinner?" My reply: "Tonight we're having pork chops, lightly seasoned and grilled over hickory. They're served with cinnamon-fried McIntosh apples, green peas and baked sweet potatoes. The entree comes with house salad with your choice of ranch or Hendrickson's dressing."

After a blank stare, I was met with, "If I eat the salad, do I have to eat the peas?"

I should have stuck with my parents' stock answer.

The pork chops were easy to cook. Stephen fired up the Big Green Egg for me. I seasoned the pork chops with Big Green Egg seasoning and grilled them about nine minutes on each side. We hadn't had fried apples in ages. They're easy too. I just peeled and cored them and cut them into wedges. Then I sauteed them in butter and cinnamon until they were soft. The potatoes just went into a 425 degree oven for an hour, and the peas (frozen) boiled for a few minutes.

I can use all the inflated language I want to describe my fancy meal. But that doesn't mean I have to use fancy methods to cook it. And I bet such simple cooking happens in the kitchens of fine dining establishments all over the place.
Thursday, January 28, 2010

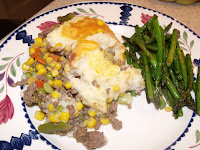
Easy Shepherd's Pie

Just as I like to keep certain products in my pantry, I also like to keep certain items in my freezer. Two of those items are ground beef and frozen peas.

The reason I always like to have beef and peas around is that when I occasionally have to go out of town to read grant proposals, my husband has to stay home and make breakfast, take boys to school, buy their poster board, get their new Lacrosse cleats, sign their communication envelopes (don't ask) and go to their practices--on top of doing his regular job. So when I come home from such grant reading extravaganzas and ask, "What did you pull out of the freezer for dinner?" he often replies, "Oh, I didn't think about that."

That's fine. Because I have ground beef. And peas.

I can always figure out some kind of dinner from those ingredients. Tonight, I made easy shepherd's pie. This is a tasty one-dish meal, especially for kids who resist eating vegetables. There's something about mixing the vegetables with ground beef and then covering them with mashed potatoes that makes those little green morsels as delectable as candy.

I got my shepherd's pie recipe from a Weight Watchers cook book. But I modified it to suit my cooking tastes. The Weight Watchers recipe called for instant mashed potatoes. I'm sorry. I just can't go there. So I use real potatoes.

Ingredients:
4 or 5 medium potatoes (Any kind will do, but I use white potatoes)
1 pound lean ground beef (I use the leanest I can get)
1 16-oz. bag frozen peas (When I have them, I use frozen peas and carrots)
1 16-oz bag frozen corn
1/2 can consomme' (which I always keep in the pantry)
1 cup fat free sour cream
1 heaping tbsp margarine
salt and pepper to taste
1 1/2 cup shredded cheddar cheese

Instructions:
Peel and cut the potatoes and put them in a pot and cover with water. Put on stove and boil for about 30 minutes or until they're soft. While the potatoes are boiling, brown the ground beef in another pot. When browned, drain the fat and then return beef to pot. Add frozen peas and frozen corn. Mix with the beef, stirring in the pot until the vegetable are soft. Add the consomme'. Bring to a boil. Turn off stove. Drain water from now soft potatoes. Return potatoes to the pot and add margarine, sour cream and salt and pepper. Using a mixer, mash and then mix the potatoes to a creamy goodness. Place the beef/vegetable mix in a 9 x 12 inch casserole dish. Spread mashed potatoes over the beef/vegetable mix. Top with shredded cheese. Place in oven and bake for 30 minutes at 350 degrees.

This is a versatile recipe. For instance, if I don't have frozen corn, I used canned (of course I drain and rinse it to remove as much sodium as possible). I'm rarely out of peas, but sometimes just for kicks (like tonight), I use mixed vegetables instead. If I don't have shredded cheddar on hand (Tonight I had only a couple of tablespoons), I take some sliced American cheese and cut it into little shreds.

Tonight I served shepherd's pie with asparagus, simply because I had the asparagus in the fridge and needed to cook it before it went bad (which would be a crying shame with asparagus selling at $3.99 per pound). But this pie can easily be a meal in itself. In fact, my sons like shepherd's pie so much that they ask me to send it to school with them for lunch.

On the other hand, my sister in-law Kelley and my dear friend Beth are likely to turn their noses up to my shepherd's pie because they don't like green peas. But one day I want to serve it to them anyway. When they say no thank you, I'll have the opportunity to reply, "All I'm saying is give peas a chance."

I've always wanted to say that.

Monday, January 25, 2010

Standing Rib Roast

This is an excellent meal, but it's one I usually cook on the weekends. No crock pot for this roast. It deserves my full attention. Many people are intimidated by such a nice cut of meat, and I can understand that. Why pay so much for this roast if you might mess it up? I felt that way too when I first cooked one. I've never over-cooked it, but I have under-cooked it a number of times, and my trial-and-error experiences have told me that this cut of meat is so tasty that it's really hard to ruin it--as long as I keep my eye on it.

Around Thanksgiving and Christmas, Publix puts standing rib roast on sale. When they do, I run over there and buy four or five at a time; then I put them in my freezer and cook them here and there over the year. Usually I buy 5 lb. or so roasts, but they come much bigger if you're feeding a crowd.

All the information I've read about cooking standing rib roast emphasizes one important tool: the meat thermometer. Now, I've cooked this roast without a thermometer, and it's turned out well, but with the thermometer, I know I can't go wrong. Stephen has a Weber remote meat thermometer that works perfectly. The skewer goes in the meat while it's cooking, but I can take the gauge with me throughout the house to monitor how the meat's cooking.


So here's how I cook standing rib roast:

Preheat the oven to 450 degrees. While the oven heats, cut the excess fat off the roast. Then sprinkle with salt, pepper and garlic powder (Many cook books advise against salting the meat because it can draw out moisture. I've never experienced that problem). Sear the meat in the oven for 15 minutes at 450. Then turn the temperature down to 325. Insert the thermometer. Roast the meat until it reaches 120-125 degrees. While it's roasting, baste it in its juices every now and then. When the thermometer reads 120-125, remove the roast from the oven and let it sit for thirty minutes. The roast continues to cook after it's been removed from the oven.

Many cookbooks will advise you to cook the meat until it's 135 degrees. I find that to be too hot because when I take the meat out of the oven, it continues to cook for another thirty minutes or so, and it ends up more done than I like it.

To cut the roast, I use an electric knife. I remove the bones from the meat by running the knife along the length of the bones. That leaves me with a nice, round piece of meat. Then I slice the roast vertically so that the slices look like nice pieces of prime rib.

I served the roast last night with roasted new potatoes and broccoli. The meat turned out wonderfully. Unfortunately, I paid so much attention to the meat that I overcooked the broccoli. Oh well. Worse things have happened.

Sunday, January 24, 2010

Davis Cooked a Duck!

Animal lovers, look the other way now. You won't like this posting. If you're a hunting and game enthusiast, read on. If you're reading this posting on Facebook, you won't see all the photos, but you can see them on the blog: http://remlerville.blogspot.com.

My older son has become a hunter, and he is especially taken with duck hunting. Twice in the last month he's been hunting with his cousin Ben Remler, and yesterday he came home with a wood duck in his hand and a big smile on his face.

The duck was really pretty. In fact, I thought it was a real shame to have shot it. But I'm not going to get into that argument. Nobody will ever win it. I just appreciate the fact that Davis let me see the duck before he took it outside to clean it. Its feathers were gorgeous.

I didn't watch what happened next. Davis went out to the back yard with a knife, and I suppose a hatchet was also involved. When he came back in, he had a cleaned up duck, which actually looked like an undercooked football.

Davis wanted to grill the duck beer can style, but a duck is too small to fit over a 13 ounce can. Instead, Davis used his dad's chicken grilling stand, which was also a little too big and made the duck look like it was put on display at a shoe store. But it did the trick. Davis seasoned the bird with Big Green Egg seasoning and Miss Alma's barbecue sauce. Then he placed it on the Big Green Egg at 350 degrees for about an hour.

When the duck was done, it looked more like a Wilson football, only smaller and without the laces. We all tasted it. I'd eaten duck before, but that was more than 25 years ago. I knew to expect dark meat, but I hadn't remembered how beefy duck tastes. Stephen said that if he didn't know he was eating duck, he'd have thought he was eating roast beef. Because of the beefiness, I think the bird would have tasted better without the Miss Alma's. I don't like barbecue sauce on a steak, so it doesn't really go well with duck either (at least not to me). But Davis and Stephen liked it. Lawson didn't have any comments, but I think he could take it or leave it.

Kelley Saved the Poppyseed Chicken Casserole

This dish has been around for a long time. I first had it at Bob and Tracy Remler's house before Stephen and I got married. I've made it dozens of time since then, and over the years I've forgotten the recipe Tracy gave me, but my modifications are just as good. The original recipe, if I remember correctly, included chicken, cream of mushroom soup, sour cream, and Ritz crackers. My version includes either cream of chicken soup or cream of mushroom soup (whatever I have in the pantry) and the Publix store version of Keebler Club crackers. While I can't substitute anything for the chicken, the gooey stuff that holds it together just has to be tasty, so I modify that part a lot. Also, my boys recently requested a modification to the cracker part of the casserole. For some reason they object to crumbled up Ritz crackers on top. They prefer Club crackers, and they like them laid on top of the casserole whole, like shingles on a roof. So here's my version of the traditional poppyseed chicken casserole:

Ingredients:
3 chicken breasts
cooking spray
1 can Healthy Request cream of mushroom soup
1 can Healthy Request cream of chicken soup
1 sleeve Publix store brand version of Keebler Club crackers
Poppyseeds

Instructions:
Place chicken breasts in large pot and boil until cooked through. Remove from water, then remove skin and tear meat from bones. Shred chicken meat. Spray 9 x 12 inch casserole dish with cooking spray. Place chicken in casserole dish. Add both soups and mix with chicken using wooden spoon. Spread around until the mixture covers the bottom of the casserole dish. Lay crackers on top of chicken mixture. Spray crackers with cooking spray. Sprinkle top with poppyseeds. Bake about 30 minutes at 350 degrees.

I serve this casserole with Uncle Ben's whole grain brown rice, which I cook in the broth I made while boiling the chicken breasts. I also serve this dish with a green vegetable. Last night, the vegetable was green beans.

Many thanks go to Kelley Remler, who saved last night's dinner by donating poppyseeds. I hadn't realized until I had already added the crackers that I was out. And that is just one of many advantages of living next door to a sister in-law who cooks the same recipes I do.

Friday, January 22, 2010

Pot Roast

Here's another great meal for a working mom. Pot roast cooks all day while I'm at the office--or in Hinesville, which is where I went today.

Pot roast enables me to use several of my favorite cooking products:


I keep at least a dozen cans of Campbell's soup in my pantry at all times. I never need that much soup during the week, but when I go to the grocery store, I examine the soup aisle and fail to remember which soups I have at home and which I'm out of. So I buy one can of each staple:
  • Cream of mushroom
  • Cream of chicken
  • Cream of celery
  • Consomme'
I also make sure I'm never without a box of Lipton's beefy onion dried soup mix. Right now, I have four boxes in the pantry. I don't think anybody ever eats these soups as soups. They just serve to make staple dishes such as green bean casserole and pot roast. And that's fine with me. I don't know where I'd be without Campbell's and Lipton's soup.

Sometimes I experiment with my soups in my pot roast. In the past I've used cream of mushroom with cream of celery. Sometimes I've used cream of mushroom with Lipton's beefy onion soup. Sometimes I combine all three. They're all good. But today, I stuck with cream of mushroom and beefy onion. Here's how I make my pot roast.

Ingredients:
  1. One pot roast
  2. Salt, pepper, & garlic powder to taste
  3. One can Campbell's Healthy Request cream of mushroom soup
  4. One packet Lipton's beefy onion soup
Instructions:
Line the slow cooker with Reynold's Slow Cooker Liner. Throw in a pot roast. Really. Throw it. Two points if you get it in the first time. That makes cooking a little more fun. Season with salt, pepper and garlic powder (if the pot roast hits the floor, it gets a little more seasoning that way). Add both soups and stir with spoon. Put lid on crock pot and turn on to low. Cook at least six hours at low setting.

I serve my pot roast with whole grain brown wide egg noodles. Tonight I also served green peas. Mm. Mm.


Thursday, January 21, 2010

Did Domino's Live Up to its New Ad Campaign?

If you've had your TV on in the last couple of weeks, you're sure to have seen Domino's new ad campaign. In case you've missed it, the new ad says this in a nutshell: "We used to suck, but now we're better. Give us a try."

Well, the St. Peter the Apostle fifth grade basketball season has left us at least twice a week a bit short on time for dinner. We've eaten out more during the week than usual. Tonight, we decided we'd bring dinner in. Domino's piqued our curiosity with their new ads and new low, low prices. Why not give them a try?

Granted, we're not hard to please where pizza's concerned. We hardly ever order pizza; in fact, I can't remember the last time we did. But when we do, we call Domino's because they're around the corner, they're fast, and they're cheap. Taste never really enters the equation.
So tonight after the St. Peter's Rams' unfortunate loss to the Calvary Cavaliers, Stephen stopped over at Domino's and picked up two pizzas: one with pepperoni and black olives and the other with ham and pineapple. We ate all but two pieces. Here's the verdict:

  • Davis: It was good.
  • Lawson: It could have been a little bit better. The crust was a little too buttery (He ate three pieces just to be sure of his opinion).
  • Stephen: It's fine. I liked it before. It's a little more spicy now.
  • Nancy: It tastes like pizza.
And there you have it! According to the Remler family, Domino's is worthy of staying in business. We're curious to know what others think of this gutsy new ad campaign and updated pizza recipe.

Monday, January 18, 2010

Kelley's Turkey with Rice and Gravy

Tonight's dinner is a breeze for a cook with kids and a full-time job. Few people cook turkey on a regular basis, saving the bird for holiday feasts. However, a turkey breast makes a tasty meal, and kids usually clean their plates. I used to be afraid of turkey. And then my sister in-law Kelley taught me the right way to do it.

Kelley's been cooking turkey breast for years. Her daughters love turkey, rice and gravy. When they were little and staying home with a nanny, Kelley would put the turkey breast in the fridge and ask the nanny to put it in the oven at about 3:00 or so. Well, one day Kelley's girls had a doctor's appointment (or something like that), so she asked the nanny to put the turkey in the oven and then bring the girls to town to meet Kelley before going home. The nanny did as she was told, but it wasn't until 5:30 or 6:00 that she remembered she'd forgotten to remove the plastic wrap covering the turkey breast! Of course, by that time, Kelley and her kids had gotten home from their appointment, and when they took the turkey out of the oven, it was shiny with a plastic coating. But it smelled delicious. Kelley had to throw the turkey away and serve peanut butter sandwiches for dinner.

From then on, Kelley realized the turkey cooking was up to her. But with a full-time job, she knew roasting the turkey breast wasn't an option. So she pulled out the crock pot. Here are the instructions (you may want to read them twice before trying this method out yourself):

Put a turkey breast in the crock pot. Sprinkle it with salt, pepper and garlic powder. Put the lid on. Turn the crock pot on.

That's it!

Select the setting that best fits your schedule. Because turkey breasts are so big, I usually ask the butcher to cut them in half. I freeze on half and cook the other. I turn the crock pot on low before I leave for work in the morning. When my son comes home from school, he always turns it off for me. Six hours on low is just right for half a turkey breast. If you're cooking the whole breast, maybe it'll need eight hours.

Now, one of my favorite products in the world is Reynolds Slow Cooker Liners. Not only do they make crock pot cleanup a breeze, but they also allow me to collect all the drippings from the turkey breast, which makes the gravy a breeze too. Here's how I make the gravy:

I put the turkey drippings in a small sauce pan. Then I mix up about a cup of chicken bouillon and heat it in the microwave. I add that to the drippings. I heat the mixture until it boils. While it's heating, I mix two tbsp. of corn starch with cold water. When the bouillon/drippings mixture boils, I add the corn starch mixture and stir until it comes back to a boil, at which time it thickens up into gravy.

I serve the turkey breast and gravy with Uncle Ben's whole grain brown rice (I always use Uncle Ben's. It's the best.), cranberry sauce and a green vegetable. Tonight it was broccoli. I wish you could see the meal. But we were halfway through dinner before somebody asked, "Are you going to blog about this meal?" Although I don't have a photo, I can report that everybody belonged to the clean plate club tonight.

Saturday, January 16, 2010

Grilled Lamb Chops with Orange Marmalade Glaze

I love lamb chops about as much as I love Brussels sprouts, so when I get to have them both for dinner, that's a really good night. Adding to the pleasure of the evening was that both my children were away for the night (one camping with a friend, the other spending the night with JoJo), so my husband and I got to enjoy our meal with no complaining about the vegetables and no bickering among siblings.

Can't ask for more than that.

Now, though, I've made lamb chops, and this is the only way I know how to make them, so I can't have them again until I finish this project--whenever that will be.

These lamb chops were cooked on the Big Green Egg. Here's how to cook them:

Ingredients:
8-10 T-bone lamb chops
Salt
Pepper
Garlic Powder
1 tsp olive oil
1/2 Vidalia onion
3/4 cup orange marmalade (I use the low sugar kind)
1 tbsp lemon juice
1 tbsp soy sauce (use the low sodium kind)

Instructions:
Light the Big Green Egg and let it heat to 350 degrees or so. While it's heating, season the chops with salt, pepper and garlic powder. When the Egg is hot, put the chops on and cook them about 7 minutes per side. While the chops are cooking, chop up the onion. Put the olive oil in a small sauce pan and add the onion bits. Cook them on medium heat, stirring constantly, until the onions are limp. Turn the burner to low and remove the onions from the heat. Add the marmalade, lemon juice and soy sauce. By this time the burner will have cooled. Return the pot to the burner and stir the marmalade mixture slowly until it's warmed through. Serve with the chops.

Tonight I served my lamb chops with roasted white potatoes and roasted Brussels sprouts. The potatoes are easy. I just peel them and cut them into little pieces. Then I toss them in some olive oil and roast them at 425 degrees for about 30-40 minutes. I like it with the sides get a little brown and crunchy. I use the same technique for the Brussels sprouts. I cut them in half, then toss them in olive oil and salt. Then I roast them at 425 (with the potatoes in the oven too) for about 20 minutes or so (depending on how big the sprouts are). I watch the sprouts carefully because if they cook to long they get mushy and they're no good.

My boys are not big Brussels sprouts fans (they'll come around soon enough), but my brother Harley loves them, so when he's in town, I try to serve them.

In Appreciation of Diana Wheeler: Beef and Broccoli

In 1988, when I moved to Savannah, my roommate, Rhonda, and I lived in a fantastic attic apartment one block away from Forsyth Park in a building that used to be a funeral home. Climbing the stairs felt like climbing Mount Everest, especially after grocery shopping, but every room inside our apartment was bathed in sunlight by the cupolas in every room. We loved that apartment and lived there for two years.

Meanwhile, a former high-school and college classmate, Camille Herring, lived a mile or so away in a little apartment in Trustee's Garden. One spring weekend, another high school friend, Diana Wheeler, came to Savannah for a visit. Camille brought her to my apartment to say hello, and we spent the afternoon together, eventually deciding to make stir-fry together for dinner.

At the local Food Lion, Diana chose a lovely head of broccoli, and when we came home, she fascinated me with the way she cut it. I had always cut my broccoli vertically so that every piece made a little tree. Diana, though, cut her broccoli horizontally, and the cross-sections of the stalk just under the florets took such funny shapes, like an illustration I'd find in a biology textbook.

Call me easily amused, but I've always enjoyed eating broccoli that looks like amoeba. For the last twenty-two years, because of Diana's influence, I've always cut my broccoli that way.

Last night I remembered Diana again as I cut broccoli for dinner. Beef and broccoli is an easy meal, and it includes vegetables my ten year-old will eat without complaining. Here's the recipe:

Ingredients:
  • 1 lb. boneless sirloin steak, cut into thin strips (or just get whatever top round steak the grocery store has already cut into strips for you)
  • 1 tbsp olive oil
  • 2 tbsp corn starch
  • 1 1/2 cups broccoli florets (I include the amoeba-looking stalks)
  • 1 medium onion, cut into 8 wedges
  • 1/8 tsp garlic powder
  • 1 can consomme
Instructions:
In one cup, stir together the corn starch with 1/2 cup water and set aside. In a skillet or wok, add olive oil and stir-fry the beef in two batches until browned. Remove. Add broccoli and stir-fry until tender-crisp. Add onion. Stir fry until softened a bit. Add consomme and corn starch mixture. Cook until mixture boils and thickens. Stir constantly Return beef to skillet. heat through.

My mistake last night was that I cooked this meal from memory, even though I haven't made it in a long time. I forgot to remove the beef. It cooked the whole time and became tough. Not too tough. We could still eat it. But it didn't consist of the juicy morsels we prefer. Hence, my ten year-old ate the broccoli and rice and put his beef aside. That was fine. I'd prefer he eat the veggies anyway.

Usually, serving this meal with rice is plenty for dinner. But I had lots of vegetables in my fridge that I'd been unable to cook this week because basketball games interfered with kitchen time. So I cooked them up too. Therefore, last night's beef and broccoli came with cauliflower roasted in olive oil and stir fried yellow squash. They weren't as interesting, though, as Diana's amoeba-shaped broccoli stalks.

Sunday, January 10, 2010

Boston Butt on the Big Green Egg


When I started this project, I decided not to impose my rules on my husband's nights to cook. But tonight, he volunteered to cook a meal so delicious it warrants a write-up.

Tonight's dinner was Boston butt, and the butt my husband cooks in his Big Green Egg is the best butt in east Chatham County.

If you like to grill but don't have a Big Green Egg, get one. It's fabulous. I'm not exaggerating. It's Georgia's best product since the cotton gin. And ever since my husband got one more than ten years ago, we've been egg-thusiasts. If you live in the metro Atlanta area, just go over to the Big Green Egg headquarters on Lawrenceville Highway. Or, if you live in coastal Georgia, you can get your Big Green Egg from Ross Daniel at Daniel Lumber Company. Tell him the Remlers sent you.

Okay, here's how to make the Boston butt:
First, get a Boston butt. Now, today we got ours at Publix. We've always been happy with their meat counter. But if you happen to live in middle Georgia, it would be worth your while to take a drive to Hawkinsville, Georgia to M&T Meats (their store is on the Lower River Road). They've got the best pork around.

Okay, so once you've got your Boston butt, spread it all over with Big Green Egg seasoning (available at most Big Green Egg distributors or online via the Big Green Egg website). Then put it on the Egg. Using a meat thermometer, cook the Boston butt somwhere between 200-250 degrees until the thermometer says the meat is 200 degrees. Now, most thermometers or cookbooks will tell you the pork is done when it reaches 170 degrees. That's true. But we like to cook ours a little longer. At 200, the meat is cooked well through, but because of the Egg's expert (Eggspert?) design, the meat is tender, juicy, delicious!

My husband chops up the meat before serving it. We can make sandwiches out of it, but usually, I just put a small pile on my plate. Why mess with the bread? The meat is so good that it really doesn't need sauce, but if you're a sauce enthusiast, you must try Miss Alma's barbecue sauce, produced by Gooseneck Farms.

Tonight, I served the Boston but with corn on the cob, cabbage, and asparagus. My boys gave the meal a big thumbs up, not because of the vegetables, which they ate because I made them, but because of their father's expert grilling skills.

We keep begging him to open a barbecue stand. Maybe one day he'll do it.

Friday, January 8, 2010

January 8: Sabra's Macaroni Casserole

Half my family is camping on the Ocmulgee River. I'm sure they're getting something good to eat while they rough it in the bitter cold. My ten year-old and I are enjoying the comforts of central heating and Kingsdown mattresses.

What with hauling boat trailers up and down I-16 and taking my ten year-old to basketball games, I've not been able to cook dinner in the past three nights. But tonight I was back in the kitchen.

Tonight's meal is great for Friday nights when you're tired from working all week and don't feel especially inspired at the stove top. It's also great for kids. In fact, it's easy enough for kids to make, as long as they're tall enough to operate the stove and don't have a tendency to burn things (or themselves).

My sister Sabra taught me how to make this dish when we were on vacation at Amelia Island. I don't know where she got the recipe, so I might be republishing someone else's dish. If I am, I apologize. Here's how to make it.

Ingredients:

1 pkg. macaroni & cheese, prepared
1 lb (or so) ground beef (I get the leanest I can find)
1 jar spaghetti sauce (I use Ragu Light)
1 cup shredded mozzarella cheese (I use fat free)

Instructions:
Preheat oven to 360 degrees. While the oven heats, prepare mac and cheese. Brown meat in a 2 qt. pot. Drain fat. Add spaghetti sauce and heat until bubbly. Spread mac and cheese in a casserole dish (I usually spray the casserole dish with cooking spray, just for good measure). Cover the mac and cheese with spaghetti sauce mixture. Sprinkle with the mozzarella cheese. Bake for 30 minutes at 350 degrees.

Now, this dish has no vegetables in it (Unless you want to count the spaghetti sauce. Ronald Reagan did it; why can't we?). So if you want your kids to get in some green at dinner, you can serve this casserole with a nice salad. Tonight, I served Viviane's Special Salad.

Viviane is a good friend of the family who always brings salad when she has dinner with us. My boys love her salad about as much as they love Viviane. The salad part is pretty simple--Romaine lettuce with chopped celery--but Viviane makes it special with her secret dressing and her salad crunchy things.

Viviane is pretty tight-lipped about her secret dressing because she might write a cook book one day. So when I make her salad myself, I use Hendrickson's dressing. If you've never used Hendrickson's get some as soon as possible. I used to buy it at Fresh Market, but they've stopped carrying it. If you live in the Savannah area, you can drive out to the Landings and purchase some at Smith Brothers. But I think it's easier just to get on Hendrickson's website and have it delivered to my door. Hendrickson's dressing is an olive-oil based fat-free, gluten-free, preservative-free delight. Try some today.

As for the salad crunchy things, they're so good and so easy to make. Again, they're great for kids to make as well, as long as they can work a stove and won't burn themselves. This is how to make them: Put some sugar in a small sauce pan (it doesn't matter how much, but I use about 3/4 cup). Heat the sugar over medium high heat, stirring constantly with a wooden spoon. Eventually, the sugar will melt and caramelize. Once the sugar is liquified, pour it over a sheet of aluminum foil. Then sprinkle chopped nuts over it (Tonight I used pecans). Let the sugar harden. Then break up the sugar into little crunchy things (I break it up with my handy-dandy rubber mallet, which I will write about repeatedly in my blog). Sprinkle them over the salad, which you have already topped with Hendrickson's dressing.

This is a quick, hearty meal, which my ten year-old rates as "Good!" So thanks to and Sabra and Viviane, my son and I didn't starve to death tonight. Try Sabra's macaroni casserole and Viviane's super salad next Friday night.


Monday, January 4, 2010

January 4: Hone Lime Salmon


I got this recipe from Rachael Ray's cookbook, 365 No Repeats. See? Great minds think alike. I bought this cookbook about two years ago for the precise reason that I thought a "no repeats" year would be fun. Do you know how many recipes I've made from this cookbook?

One.

Honey Lime Salmon.

It's good stuff. Along with the salmon is the recipe for a warm spinach and corn salad. Here's how I make each.

To Make the Salmon:
First, I must point out that these instructions are my representations of Rachael's recipe. I am not quoting her.

Get some salmon filets. In a shallow dish (like a casserole or pie plate, depending on the size of the filet) pour some honey. Then squeeze in the juice of one lime. Sprinkle in some chili powder. Don't you love how Rachael Ray avoids measurements? Mix up these ingredients. Then put the salmon filets in this mixture and make sure they're well coated.

Put a skillet on the stove and pour in about 2 tbsp of olive oil (Rachael loves extra virgin olive oil, or EVOO. I'm not that particular. Olive's olive). Heat up the oil to medium high and then put the filets in the skillet. Cook the filets about 4-5 minutes on each side, longer if you have big, thick filets. Serve with warm spinach and corn salad.

To Make the Spinach and Corn Salad
Make this salad while the salmon is cooking. I have modified this part of the recipe a bit. The biggest difference is that I use Vidalia onion instead of the red onion Rachael Ray calls for. I have two reasons for that. First, because I live only 90 minutes away from the onion capital of the world, I feel almost obligated to use Vidalias whenever possible. I also like to support local economies. Second, my husband hates red onions.

I also use chicken boullion instead of chicken stock just because it's a lot more convenient to keep around. I find it doesn't make a difference in the taste. What's more, I usually forget to squeeze in the lime juice at the end. Nobody misses it. Okay, here's how to make the salad:

Ingredients:
2 tbsp olive oil
1/2 Vidalia onion, chopped
1 red pepper chopped
3/4 of a 16 oz pkg frozen kernel corn, thawed
1/2 cup chicken boullion
1 can black beans
1 bag (about 6 cups) fresh spinach leaves
a sprinkle or so of red pepper flakes
juice of 1 lime

Put olive oil in a large pot (like a Dutch oven--the spinach takes up a lot of room). Heat to medium high. Add onion and cook until transparent. Add pepper. Cook about two to three minutes. Add corn and chicken broth. Cook until chicken broth boils. Add black beans and cook for a minute or so. Turn off heat. Add spinach leaves. Toss until they wilt. Sprinkle in the pepper flakes. Toss some more. Squeeze in lime juice. Toss one last time.

Along with the salmon and warm spinach and corn salsa, I served yellow squash and garnished with blood orange slices. Blood oranges make everything seem a bit more exotic.

My fifteen year-old said dinner was "okay." Hey, at least he showed up for dinner tonight! My ten year-old said dinner was "All right. It could've been better." I went out on a limb and gave it a rating of pretty darn good. My husband was late getting home tonight. He's eating now. So far, I've heard no complaints.

Oh, speaking of my fifteen year-old, he told me that he ate the leftover calypso chicken for lunch today. He reports that it was better than the teriyaki chicken he had for dinner at the Japanese restaurant last night. Score!

The honey-lime salmon is the last dish I'll make for a few nights. I'll be out of town tomorrow night to deliver my husband and fifteen year-0ld to Hawkinsville for the annual river trip (I'll post photos later). Then Wednesday night is dinner at JoJo's. Thursday night my younger son has a basketball game, so I doubt I'll have time to cook then. That means no more cooking for me until Friday night. That will give me time to browse my list and decide what I'm going to make. Stay tuned.

Sunday, January 3, 2010

January 3: Calypso Chicken

This morning before I left for the grocery store, I asked my fifteen year-old what he wanted for dinner. He asked for his favorite meal, Calypso chicken. I was happy to oblige. I like the dish too, and we haven't had it in a while. So off to Publix I went to get the ingredients.

Then what did my number 1 son do? He stood me up for sushi and Megan.

Megan is the hottie my son took to the homecoming dance last October. They're just friends, he said, but they text a lot. When Megan drug her heels taking her driving classes, my boy made a bet with her. "If you get your license before I do," he proposed, "I'll take you out to dinner." Megan got her license on December 16th. This afternoon she called my son and and asked him to make good on his bet.

So off they went to the local Japanese restaurant. Before he left, he said, "I can always eat Calypso chicken another night." Clearly he doesn't understand the rules of the Remler Menu. Oh, well. More chicken for me.

The Calypso chicken recipe comes from the Publix Aprons recipe series. Publix employees do cooking demonstrations in the store and hand out recipe cards. Conveniently, all the ingredients are neatly displayed adjacent to the cooking stand. I have modified the recipe to suit my cooking preferences, but I must credit the source of this fine recipe.

Ingredients:

1 lb. or so of boneless, skinless, chicken thighs
salt
pepper
garlic powder
1-10 oz pkg. yellow rice (I use Vigo)
1 can lite coconut milk (found in Oriental foods section)
1 1/2 cups chicken broth (I make it with boullion)
1 generous handful of raisins
1/3 cup frozen green peas
1/2 Vidalia onion
1/4 cup molasses
3 tbsp chili jam sauce (you can find it in the Oriental foods section)
1 tbsp cilantro paste (available in the produce section--see photo)

Instructions:

Season chicken with salt, pepper and garlic powder. Put aside. Pour coconut milk and chicken broth into a non-stick po
t and add yellow rice mix and raisins. Bring to boil. Watch this pot carefully because when coconut milk boils over, it makes a big mess of the stove. Reduce heat and let rice simmer. When it's about 3/4 done, add the frozen green peas. Recover until rice has finished cooking. While the rice is cooking, chop the onion and place in a small bowl. Add molasses, chili jam sauce and cilantro paste and stir. Spray electric skillet or frying pan with cooking spray and heat to medium high. Add chicken. Allow chicken to brown on one side. Then turn and allow to brown on the opposite side. Add molasses mixture. Cover and simmer for about 20 minutes or until chicken is cooked all the way through. By this time the rice should be finished as well.

I serve this dish with green peas. The molasses mixture makes a tasty gravy for the chicken, but I also put some on my rice and peas as well.

The Publix Aprons recipe calls for a dash of jerk seasoning in the rice. Sometimes I add it, but I often omit it because my younger son doesn't like the spiciness of the jerk seasoning.

There's a little bit of Calypso chicken left over. Maybe my son can have some for lunch tomorrow.

The Remler Menu, Season 1

This blog has been woefully neglected in the past several months, but now Remlerville is back with a new project! For the next few months, instead of featuring family photos and milestones, this blog will feature food.

On January 1, 2010, my first new year's resolution was to learn how to make a ham. You see, my mother in-law, JoJo, makes a killer ham, and over the past 20+ years, I've asked her repeatedly how to make it, but the task has always intimidated me. This year, I faced my fears. My first task New Year's Day was to cook that ham.

Doesn't it look good? It tasted good too.

While the ham was cooking, I starting wondering how many days I can go cooking a different meal each time, no repeats. I made a list of the meals I commonly make, and I figured that if I cook every day, I could get through more than a month without repeating every dish.

However, cooking daily is impossible in my life. With a full-time job and two kids who play basketball and lacrosse, I'm bound to be away from home from time to time, not to mention the nights I want to have "Do It Yourself Night." So with nights off, I might be able to get through a couple of months without repeating any dishes.

And so 2010 is the year of The Remler Menu. Here are the rules:

1. Each time I cook dinner, I must cook a different meal.

2. I am not imposing my plan on my husband. Hence, on nights he cooks meals, he can cook whatever he wants.

3. Wednesday nights are off because JoJo always cooks dinner that night.

4. Nights that I teach or am out of town or am at writing group meetings are also exceptions, as are nights that my sons have basketball games, which call me away from the kitchen.

5. The goal is to cook a different main dish recipe each time. So I may cook chicken multiple times, but the recipe will be different.

6. Not all family members must be present for me to cook a meal. However, I do have to show up.

7. When I cook a different main dish, I'll include a photo and share the recipe on this site. I'll also reveal the family commentary on each main dish.

6. Side dishes are not included in this plan, but as I discuss the meal, I'll include recipes of my favorite side dishes. I'll also discuss desserts, as applicable, as well.

Although I cooked the ham on January 1st, we didn't eat it until January 2nd. That's because I invited JoJo and my father in-law, Bruce, over for dinner to partake of said ham, but they couldn't come over until last night. So the Remler Menu officially began on January 2nd with a meal of ham, butter peas, sweet potatoes, brocolli and cauliflower and corn muffins.

Here's how I made the ham:


Ingredients:

1 ham (I bought a 7.5 lb ham)
pepper
mustard (whatever you have in the fridge)
brown sugar

Instructions
Heat oven to 325 degrees. Put the ham in a brown paper bag. Then put that bag in a disposable aluminum roasting pan. Put the ham in the oven and roast it for about 20 minutes per pound (which in my case turned out to be 2 hours and 40 minutes). About three quarters of the way through (in my case, about 2 hours) remove the ham from the oven and take it out of the paper bag (I used scissors and cut the bag away from the ham). Remove as much fat as you can. Then score the ham. Pepper it. Then smear mustard all over it. Pat brown sugar over the mustard. Return the ham back to the oven and roast it for the remaining time. Watch it carefully to ensure it doesn't crust over too much.

I'm not sure what constitutes crusting over too much. Perhaps JoJo would like to elaborate. I found that after 2 hours and 40 minutes, my 7.5 pound ham was cooked perfectly, with a nice honey-mustard glaze pooled at the bottom of the ham. Yum!